
Getting a free coop sounds like a good deal. It sure did to me. We just purchased our first home a little over a month ago, and we got a call about TWO free coops and SIX free hens. Oh my goodness, I was ecstatic! When she sent me the pictures, I was over the moon! There was one premade coop, and one larger home constructed coop. I did my research and looked at what I needed to do to transport hens, then I reserved a Uhaul trailer. What I didn’t do was look up what I was supposed to do if I was picking up hens AND a coop. Which is why I decided to write this post. Nothing went the way we expected. It took a very long time, we needed more transport space, we didn’t consider how to securely transport it, and that was only half the battle. The other half began when we got home!
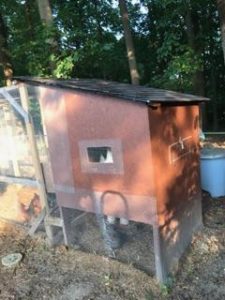
Manufactured Coop
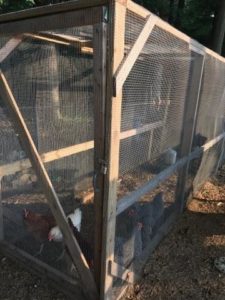
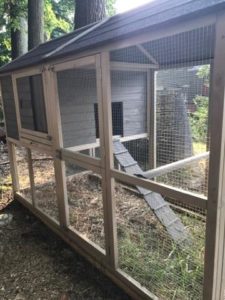
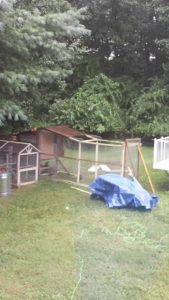
Homemade Coop’s Run
Homemade Coop
How Long Does Moving a Coop Take?
I thought I was doing a really good job preparing for Operation: Chicken Acquisition; I even had one of my friends come over, because I knew my three young boys being on site would just confuse things. We were aiming to be at the coop owner’s house at 9:30am, but we had to pick up the trailer and stop by Home Depot, so we left at 7:45am. I told my friend that we would probably be back around lunch time, but wow, was I wrong! We didn’t get back to the house until around 3:30pm!
Tip: budget for at least six hours when you are going to pick up a handmade coop!
How Many Friends Should You Ask For Help?
I asked three friends to come help us out with moving these coops. With my husband, that made four lifting the heavy 4’ x 4’ coop. Really there wasn’t more room for an additional person, but they certainly could have used more help when it came time to get it over the waist height (waist height to me, probably hip height to them) chain link fence. We didn’t notice until they started moving it, that the gate wasn’t wide enough to pass the coop through! What a tragedy! Moving the home constructed chicken run was more of the same problem. The small manufactured coop only required a two man lift, and it fit easily through the gate.
Tip: invite two more people than you think you will need.
How Much Trailer Space Will You Need, And How Should You Secure the Coop for Transport?
I sorely misjudged how much space I was going to need to move the coops. I was very happy to discover UHaul’s trailer rentals. I didn’t really have any idea how I was going to move the coops (ask a bunch of friend’s with trucks for help?), until a coworker mentioned UHaul’s pretty cheap trailer rentals. For a 6’ x 12’ trailer with a ramp, plus the insurance, I paid $40. Thankfully, one of my recruited friends DOES have a truck. We ended up putting the small coop in his truck, because we needed the entire trailer for the larger coop and run. We didn’t think about it until we got on the highway, but the shingles on the coop were not going to stay on! A tarp, tightly secured over the top, would have been really useful, but sadly both of our tarps were at home. My husband and one of my friends resorted to just tearing the shingles off and tossing them in the trailer. We have since put new shingles on the coop, and those old shingles will be used to help me kill grass for our new house’s first garden beds!
Tip: plan for more transport space than you think you’ll need, and bring a tarp to help break the wind.
How Will You Secure the Chickens for Transport?
This was one part of the whole thing that I felt went really well! I scoured BackyardChickens.com and chicken owner blogs about the best way to transport hens. I read that if you are going a short distance, a cardboard box will work, but if you are going longer distances (which you might for a really good deal, or rare chickens), then you should invest in something more sturdy. I can proudly say I have now used both of these methods.
An important part to consider is that you don’t want your chickens rolling around in the box. For our first chicken retrieval, we purchased a large Rubbermaid container that we knew six chickens would fit in comfortably for 40 minutes. Ideally, you want your chickens to be able to settle in and not tumble. We drilled holes in it for air ventilation. In the future, if I need to use that large container for adult hens, I will cut out a 2’ x 1’ square in the top and secure a patch of hardware cloth to it, for optimal air flow. I filled the bottom of my container with pine shavings, and voila! We didn’t secure the chickens in the box until everything else was done. With some meal worms and mad chicken catching skills, it was the easiest part of the whole endeavor, not including moving the manufactured coop.
The following week I went to pick up a couple 11 week old pullets from a local backyard farmer. She only lives about 15 minutes from me, and because I knew they would be small, I didn’t want to use my large plastic container. They would have ricocheted around in there like bouncy balls. I used a small cardboard box with pine shavings in it. It worked very well, despite being a bit bigger than I would have liked for such small chickens. Side note: we eat a lot of eggs, so I’m hoping to work my way up to 10-12 hens, but we will need a bigger coop for that, since everyone can only free range for a couple hours after work each day.
Tip: Know what you are going to use to transport your chicken, and consider the distance you are traveling.
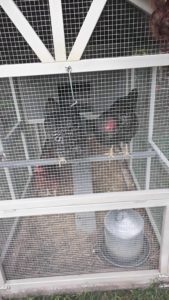
Chickens hanging out in the small coop while we work.
Are You Prepared for Some Rebuilding When You Get Home?
The difficulty here was not surprising after all the work we had to do getting the coops from their original location. In order to get the chicken run on the homemade coop into the trailer, we had to cut it in half. We knew it wasn’t going to be usable after that. My husband ran to home depot and purchased 2×4’s and chicken wire to build the new run and new shingles for the roof. That following day, Sunday, he set up the frame of the run. On Monday, I placed the wire on the run (got to use a staple gun for the first time, whoo!), and he did the shingles. We had some wire fencing leftover from another project, so we placed it around the small coop each day we needed to work on the large coop. The small coop with the extra space around it from the ad-hoc fencing was still a bit small, but the ladies were pretty curious about all of the work we were doing, so they didn’t seem to mind.
Tip: Know where you are putting the chickens when you get home. They can’t stay in the box forever!
Are You Going to Need Building Supplies When You are Ready to Rebuild or Repair?
So having to buy new materials for a new chicken run was not a cost we counted on, but if you are determined to get a handmade coop from someone, you can plan ahead. People end up with things like extra rolls of chicken wire and leftover lumber all of the time. You should scour Craigslist and local homesteading and farm groups on Facebook to see if you can find any cheap materials. At Home Depot, we paid $60 per roll of chicken wire, but I have seen rolls for $25 on Craigslist. If you plan ahead, you can save significantly on those supplies. I highly recommend renting a trailer if you don’t own one (or know someone who does), especially if you already have a hitch like us. That was a completely pleasant experience, and I even reserved the trailer online. No mix up’s at the trailer location, and the employee who helped us was very friendly.
Tip: plan on building a new chicken run, and find materials on CL or FB

My husband rebuilding the run while being supervised by my youngest.

Our happy chickens!
Our new to us coops!
Don’t get me wrong, I wouldn’t change having our chickens for the world. This is something I have spent years working towards. We have rented in HOA’s in the past, and I wanted to own my own home before we invested in a coop and chickens. Moving these coops was something we couldn’t stop once we got started, and I’m hoping that for every person who googles “How should I prepare for moving a chicken coop?” or some other related question, they will end up here and read about our beneficial tragedy!
In 2014, we traveled to PA (from NY) to buy two coops on wheels, so it’d be easy to load, right? We asked the seller the size of the coops & approximate weight. Thankfully, my brother’s 16 foot trailer was big enough to fit both coops, but they were way heavier than expected. And the wheels weren’t the best. The one had small wheels that basically went flat when we tried to move it. The other wheels were ok, but weren’t placed in the right location to move the coop easily. It took much longer than expected to get the coops loaded, just like you experienced. By the time we got back to our town, we stopped at TSC to buy new wheels, so we could unload the coops. We ended up having to put new “axles” on both coops. Then, the larger “PA” coop (originally used for pigeons) was divided in two with bread trays & filled with milk crates for nesting boxes. Those things came in handy, but first everything needed to be cleaned out, painted, etc. The 2nd smaller coop had some holes that weasels could get through, plus just had bread trays for a floor. But, once we made the needed adjustments, they’ve continued to serve us for the past 4 years.
Maria, that sounds like a much worse ordeal! I’m glad we are local! It’s encouraging to hear that repairs made them solid for you guys! We are going to expand the big coop this spring to go up from 6 hens to 12! I’m very excited! Thanks for sharing your experience!